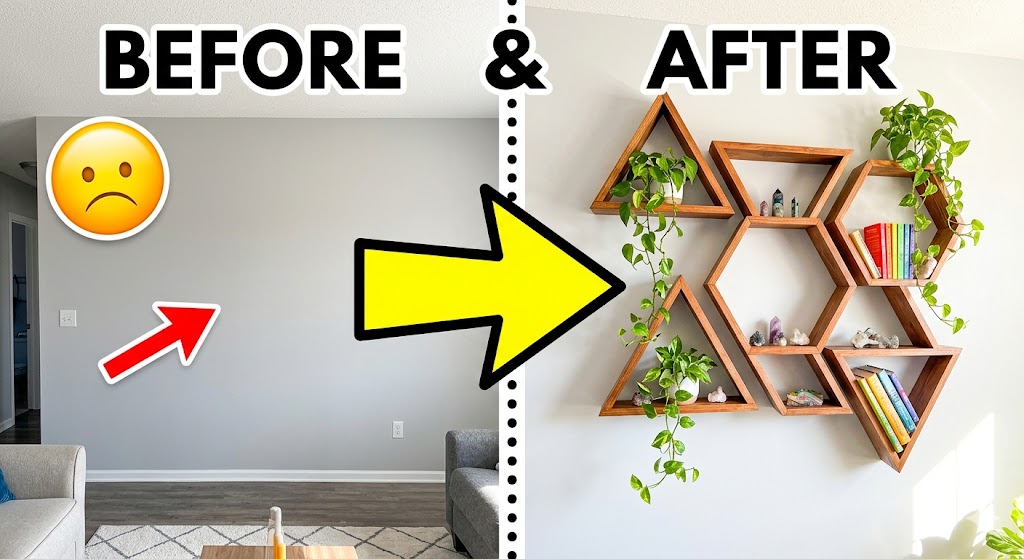
When it comes to blank wall spaces, standard linear shelving can sometimes feel a bit uninspiring. If you want to display your favorite plants, crystals, or books while adding a modern architectural element to your room, learning how to build floating geometric wall shelves is the ultimate solution.
Geometric designs—like hexagons, triangles, and interconnected squares—look incredibly expensive when purchased from high-end boutique decor sites. However, with some basic lumber, a miter saw, and a free afternoon, you can construct these striking statement pieces yourself for a fraction of the retail cost.
In this comprehensive guide, we will break down the exact math, angles, and mounting secrets required to create flawless, professional-grade floating geometric wall shelves that sit completely flush against your drywall.
The Math Behind the Magic: Perfect Angles
The secret to a stunning geometric shelf lies entirely in the angles of the joints. If your cuts are even a single degree off, the pieces won’t align, leaving messy gaps that wood filler can’t easily hide.
For this project, we will focus on the classic three-tier interconnected triangle layout, which offers incredible structural stability and a striking minimalist silhouette.
The Angle Blueprint: A triangle consists of $180^\circ$ total. To form a perfect equilateral triangle shelf, you will need three wood segments cut at identical lengths. Each corner must form a $60^\circ$ angle. Because two pieces of wood meet at each joint, you must set your miter saw to exactly $30^\circ$ for every single end cut.
Supply Checklist & Tools
- The Wood: 1×4 Select Pine boards (these are lightweight, affordable, and straight).
- Miter Saw: Crucial for hitting precise, crisp angles.
- Wood Glue: High-quality PVA wood glue (like Titebond II).
- Brad Nailer or Clamps: To hold the joints tightly secure while the glue cures.
- Orbital Sander & 120/220 Grit Sandpaper: For a silky-smooth finish.
- Keyhole Brackets: The absolute best hardware choice for a true “floating” illusion.
- Wood Stain or Paint: Muted oak or rich walnut stains show off natural grain beautifully.
Step-by-Step Tutorial: Building the Shelves
Step 1: Measure and Cut Your Segments
To make three interconnected triangles, cut 9 equal pieces of your 1×4 pine board. A length of 10 inches per side creates a wonderful medium-sized accent piece. Set your miter saw to a $30^\circ$ angle and make your cuts, ensuring the angles slope inward on both ends of the board (forming a trapezoid shape, not a parallelogram).
Step 2: Dry Fit and Sand
Before reaching for the glue, lay your pieces out flat on a workbench to verify they close perfectly into triangles with zero gaps. Once you confirm the fit, give the inner faces of the boards a thorough sanding. It is significantly easier to sand these surfaces now rather than trying to get into tight interior corners after assembly.
Step 3: Glue and Nail the Joints
Apply a generous bead of wood glue to the mitered edges. Press the joints together firmly. Use a strap clamp or corner clamps to lock the shape into place, then fire two brad nails through the corners to pin the joint while it dries. Let the individual triangles cure for at least 2 to 3 hours.
Step 4: Interconnect the Layout
To get that high-end designer look, arrange your three finished triangles on the table so they overlap or stack into a larger geometric web. Mark the intersecting points with a pencil, use wood glue at those contact zones, and clamp them together securely.
Step 5: Install Hidden Floating Hardware
To make the shelves look like they are magically levitating on your wall, flip the completed structure over. Use a router or a spade bit to create a shallow recess on the back of the top wood segments and screw in keyhole hangers. This allows the shelf to hang directly onto screws anchored into your wall studs, sitting perfectly flush against the drywall.
3 Pro-Tips for a Flawless Finish
- Don’t Skip the Wall Anchors: Because geometric shelves have minimal contact points with the wall, ensure you use heavy-duty toggle bolts or drywall anchors if you cannot line up your keyhole brackets directly with a wooden wall stud.
- Use Wood Filler Strategically: If your cuts have microscopic gaps, mix a tiny bit of the sawdust from your cuts with wood glue to create a custom paste. Press it into the cracks before staining so it accepts the color perfectly.
- Keep Decor Minimal: These shelves are pieces of art on their own. Avoid overcrowding them. Style them with small trailing plants (like a pothos), a couple of favorite books, or a tiny ceramic crystal dish to let the wood shape shine.

")


")


