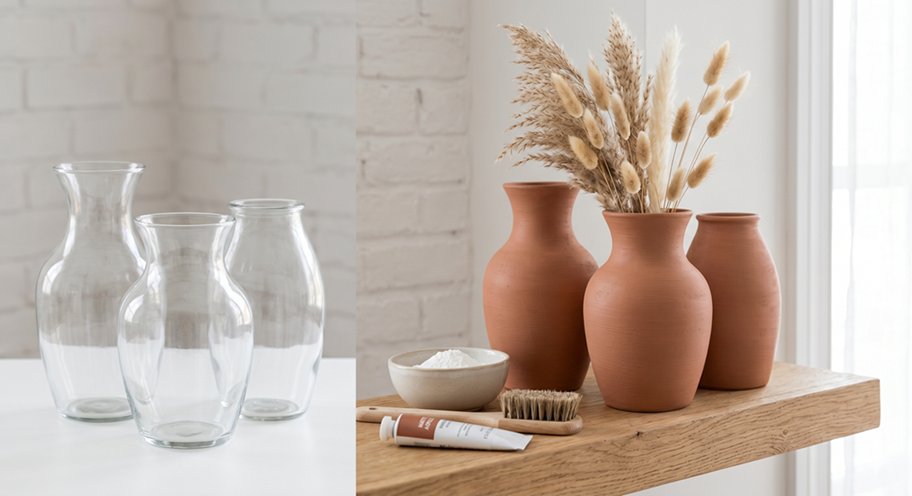
Have you ever walked through a thrift store or a discount home goods aisle, spotted a glass vase with a terrible shiny pattern, and thought, “If only that were matte terracotta, it would look like a $150 designer piece”?
You aren’t alone. The minimalist, earthy aesthetic is everywhere right now, but the price tags on authentic stoneware and ceramic vessels can be jarring.
Luckily, you don’t need a pottery wheel or an expensive kiln to get the look. With a simple, internet-famous DIY hack using acrylic paint and baking powder, you can transform any outdated, glossy glass or plastic vessel into a stunning, textured faux-ceramic masterpiece over a single weekend.
In this guide, we’ll break down the exact ratios you need, step-by-step instructions, and the insider mistakes to avoid so your finish looks genuinely high-end—not like a messy grade-school craft project.
The Faux-Ceramic Paint Recipe
Before you start pouring, keep in mind that the ratio determines your texture. If you add too little baking powder, it just looks like thick paint. If you add too much, it becomes clumpy and flakes off when dry.
The Golden Ratio: For every 1 cup of matte acrylic paint, mix in 1 to 2 tablespoons of baking powder.
Note: Use baking powder, NOT baking soda. Baking powder creates a chemical reaction that creates tiny, airy bubbles, giving the paint that authentic, porous stone texture as it reacts to the liquid paint.
Everything You Need (Supply Checklist)
- An old vessel: A thrifted glass vase, an empty pasta jar, or an outdated ceramic pot.
- Matte or Satin Acrylic Paint: Earthy tones work best (warm beige, terracotta, muted olive, or charcoal grey).
- Baking Powder: A standard tub from the baking aisle.
- A Mixing Container & Stick: An old plastic cup or container you don’t mind tossing.
- A Paintbrush: A stiff-bristled brush or a foam brush (stiff bristles add great texture lines).
- Fine-Grip Sandpaper (Optional): Grit 220, just to prep the surface if your vase is incredibly slick.
Step-by-Step Tutorial: Transforming Your Vase
Step 1: Prep the Surface
Thoroughly wash your vase with warm, soapy water to remove dust, grease, or price tag residue. If you are working with an ultra-glossy glass surface, give it a quick, light sand with 220-grit sandpaper. This gives the paint something to grip onto and prevents it from peeling later.
Step 2: Mix the Paint “Batter”
Pour your acrylic paint into your mixing container. Slowly sprinkle in the baking powder. As you stir, you will notice the paint instantly begin to fluff up, expand, and take on a texture similar to chocolate mousse. Let it sit for about one minute to let the reaction settle before painting.
Step 3: Apply the First Coat
Dip your brush into the mixture and apply it to the vase.
- Pro Tip for Realism: Instead of painting random strokes, mimic how real pottery is made. Paint in horizontal, sweeping strokes around the circumference of the vase. This replicates the natural spinning lines left behind on a potter’s wheel.
Step 4: Let it Dry and Reapply
Let the first coat dry completely (about 45 minutes to an hour). Because of the baking powder, it will dry much faster than normal paint and will look incredibly matte. Apply a second coat to ensure none of the original glass or ceramic shines through.
Step 5: Style It
Once fully cured (leave it overnight to be safe), your vase is ready! Because the interior might still be exposed to water, it is best to style this piece with dried florals—like dried pampas grass, eucalyptus bunny tails, or faux olive branches.
3 Critical Mistakes to Avoid
Based on our firsthand trial and error, keep these three rules in mind to ensure your project is a massive success:
- Do Not Store Leftover Paint: The chemical reaction between the paint and the baking powder doesn’t last forever. Within 24 hours, the mixture will deflate, become incredibly gummy, and turn unusable. Only mix what you plan to use immediately.
- Keep the Inside Dry: Unless you seal the inside with a waterproof clear coat, do not pour fresh water directly into your newly painted vase. The moisture can seep under the paint layer from the top rim and cause it to bubble or slide off.
- Choose Matte Paint Over Glossy: Never use glossy or metallic acrylic paint for this project. The goal is to mimic raw earth, clay, or stone, which are naturally light-absorbing.
Ready to Elevate Your Space?
This quick DIY project proves that great interior style doesn’t have to cost a fortune. It’s highly customizable, takes less than two hours of active work, and gives a gorgeous, modern texture to any shelf, mantle, or coffee table.
Have you tried the baking powder paint trend yet? What color are you planning to paint your thrifted find? Let us know in the comments below!


")


