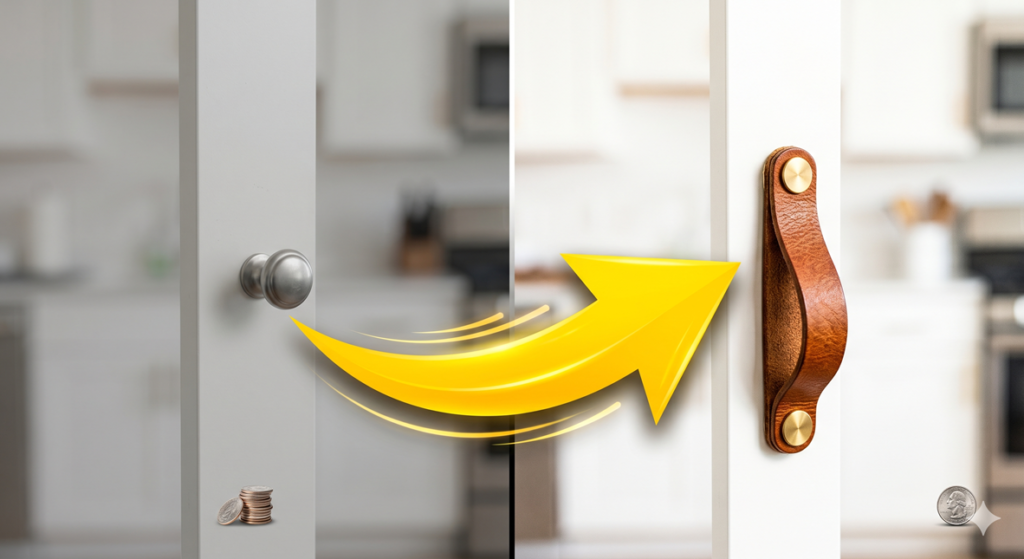
If you’re looking for a quick, high-impact way to upgrade your kitchen or refurbish an old dresser, making your own DIY leather cabinet pulls is one of the best weekend projects you can tackle. It’s an incredibly affordable trick that instantly injects a warm, modern Nordic aesthetic into generic, builder-grade furniture without requiring a massive budget.
The beauty of this project lies in its simplicity. You don’t need advanced carpentry skills or expensive machinery to replace boring metal handles with something tactile, unique, and elegant.
In this guide, we will walk you through the step-by-step process of crafting your own custom leather hardware, including the exact measurements and structural secrets that keep them looking pristine for years.
Why Leather Hardware Works
Cabinet hardware is often called the “jewelry of a room.” Standard metal pulls can feel cold and industrial, but leather adds an organic texture that softens sharp, minimalist lines. It pairs beautifully with white cabinets, moody dark hues, and natural wood grains alike.
Best of all? Buying pre-made leather pulls at high-end design boutiques can easily cost $15 to $30 per piece. By making them yourself, you can upgrade an entire kitchen or an oversized bedroom dresser for a fraction of that price.
Supply Checklist & Dimensions
To ensure your new pulls look like they belong in an architectural magazine rather than a grade-school workshop, choosing the right material thickness is crucial.
- The Leather: Opt for vegetable-tanned leather strips (around 2mm to 3mm thick, or 5-6 oz weight). Thinner leather will stretch out over time from daily pulling; thicker leather will be too stiff to fold into a neat, clean loop.
- The Hardware: Chicago screws (also known as binding posts) or standard cabinet screws paired with decorative finish washers. Matte black or brushed brass finishes offer the best luxury contrast against raw leather.
- The Tools: A rotary leather hole punch, a sharp utility knife, a heavy metal ruler, and a self-healing cutting mat.
The Standard Dimension Blueprint: For a typical cabinet door or drawer, cut your leather strips to 1 inch wide by 5.5 inches long. When folded in half to create the loop, this gives you a perfectly proportional 2.5-inch pull with plenty of clearance for your fingers.
Step-by-Step Tutorial: Crafting the Loops
Step 1: Cut the Strips with Precision
Place your leather strip flat on your cutting mat. Using your metal ruler as a rigid straight-edge guide, press down firmly and use your utility knife to cut your strips into identical pieces. Precision during this step prevents the finished cabinets from looking uneven down the line.
Step 2: Round the Edges (Optional)
For a truly premium, manufactured finish, use your utility knife or a specialized corner-rounding tool to subtly shave the sharp corners off the bottom ends of the strip. It’s a tiny detail, but it changes how the hardware feels in your hand every time you open a drawer.
Step 3: Punch the Bolt Holes
Fold your cut leather strip exactly in half, matching up the two short ends perfectly. Mark a center point roughly 0.5 inches down from the cut edges. Using your rotary leather hole punch, select a wheel size that matches the diameter of your Chicago screw shaft, and punch through both layers of leather simultaneously.
Step 4: Install and Secure
Remove your old cabinet hardware entirely. Insert the female side of the Chicago screw through the back of the cabinet door hole so it sticks out of the front face. Push your folded leather loop directly onto the thread, screw in the decorative front cap, and tighten it firmly with a screwdriver.
3 Pro-Tips to Prevent Long-Term Wear
- Seal the Edges: Raw cut leather can fray slightly or absorb natural oils from your hands over time. Apply a tiny amount of leather burnishing gum (like Tokonole) or a clear beeswax leather conditioner to the edges to seal them tightly.
- Account for Kitchen Moisture: If you are installing these in a high-humidity area like a bathroom or right next to a kitchen stove, spray the leather with a protective water-resistant layer before assembly to prevent water spotting.
- Mind the Hole Size: Do not make the punched hole in the leather larger than the screw shaft. A tight, snug fit ensures the loop doesn’t wiggle or rotate out of alignment during daily heavy use.
")


")


